Do you want to display social media reviews on your WordPress website? You may have business reviews from your customers on different social sites like Google, Facebook, etc. These reviews are excellent social proof that you can use to attract new visitors towards your business. In this article, we will share how to display business reviews from Google, Facebook, and Yelp in your WordPress site.

Why You Should Display Business Reviews in WordPress?
Your customers often leave positive reviews about your business on social platforms like Google, Facebook, or Yelp. These reviews are excellent social proof and can be used alongside customer testimonials on your website.
You can show these business reviews on your WordPress site to build trust and boost conversions (Bonus: see 29 more ways to use social proof to increase conversions).
Normally, you would need to install separate WordPress plugins to show reviews from multiple social platforms. Each plugin has different settings, and it may even conflict with each other.
We recommend using WP Business Reviews plugin by WordImpress. It’s an all-in-one solution to show Google, Facebook, and Yelp business reviews.
That being said, let’s take a look at how to easily show Google, Facebook, and Yelp reviews in WordPress.
Showing Google, Facebook, and Yelp Reviews in WordPress
First thing you need to do is to install and activate the WP Business Reviews plugin. For more details, see our step by step guide on how to install a WordPress plugin.
Upon activation, you need to go to Reviews » Settings page in your WordPress admin area. Under the ‘License’ tab, you need to add your license key and activate it.
You can get the license key from your account on WP Business Reviews site.
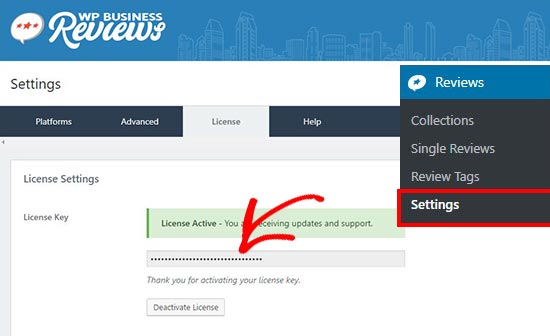
Once the license key is successfully activated, you need to go to the ‘Platforms’ tab and select the review platforms from where you want to display business reviews in WordPress.
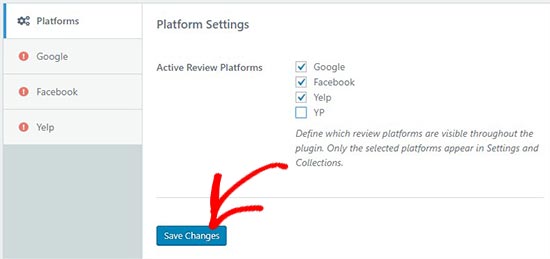
Once you have selected the platform, click on the ‘Save Changes’ button to store the settings.
For the sake of this tutorial, we will select Google, Facebook, and Yelp to pull reviews from. You can choose the platforms that you like.
Next, you need to go to the ‘Google’ tab on the left side and add the Google Places API Key to show Google reviews on your website.
You can login to your Google account and click on the visit Google Places API documentation link to get your key.
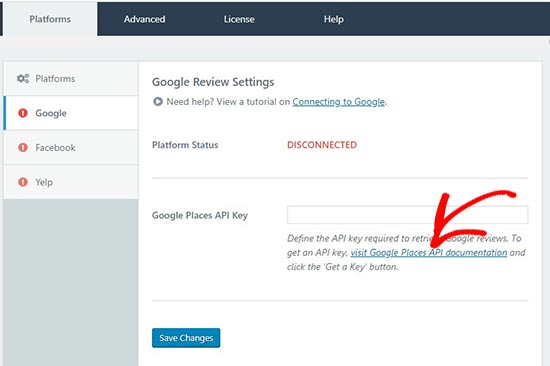
It’ll change the platform status from disconnected to connected. Make sure to click on the ‘Save Changes’ button to continue.
After that you need to head over to the ‘Facebook’ tab and click on the ‘Connect with Facebook’ button. It will ask you to login to your Facebook account.
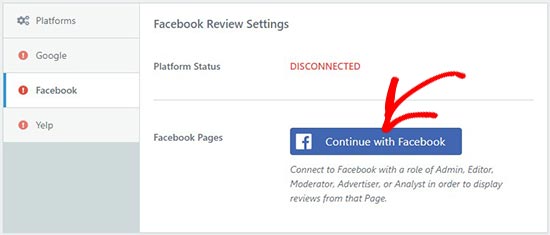
Once logged in, you need to give permissions to Facebook for the connection. Don’t forget to click on the ‘Save Changes’ button.
Now, go to the ‘Yelp’ tab and click on the create a Yelp App link to get your Yelp API Key.
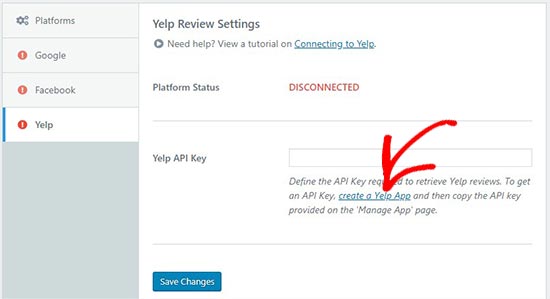
Click on the ‘Save Changes’ button to change the platform status form disconnected to connected.
After connecting all the platforms successfully, you can go to Reviews » Collection page in your WordPress admin area. From here you need to create the collection of your business reviews.
You can do this by clicking on the ‘Add Collection’ button on any platform to create your reviews collection.
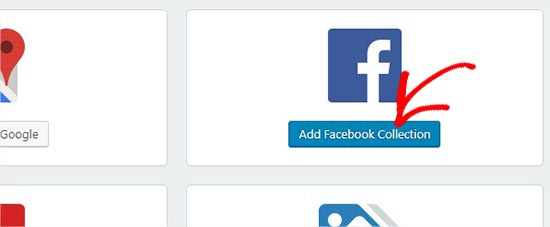
It’ll take you to a new page where you can build a reviews collection.
Start by adding a title and selecting a review source on the right side. After that you need to click on the ‘Get Reviews’ button on a resource to retrieve reviews from the source.
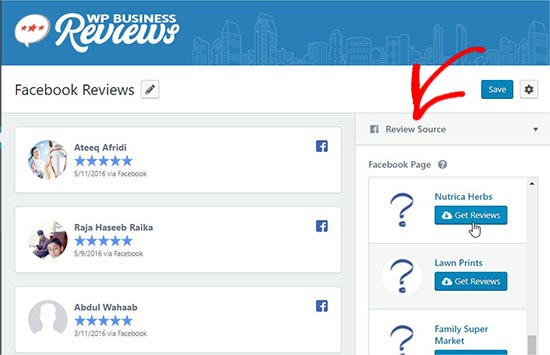
It’ll show all the reviews from this source on the left side of your screen.
Next, you can open the ‘Presentation’ options on the right side. In these options, you can select style, format, maximum columns, and maximum reviews for the collection.

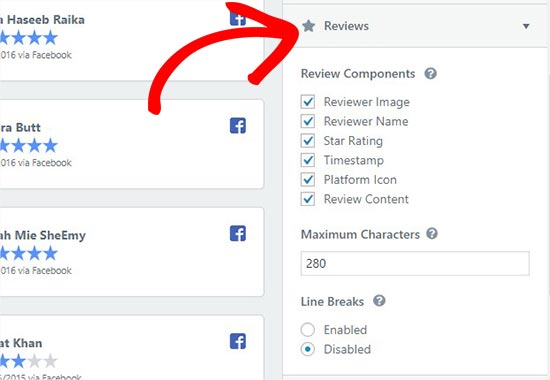
Nextx, you can go to the ‘Reviews’ tab to enable / disable the review components like reviewer image, name, star rating, etc. You can also define the maximum number of characters for each review.
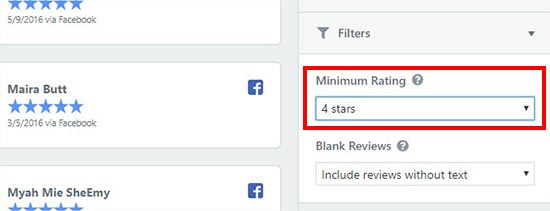
Lastly, you can go to the ‘Filters’ tab. There you’ll find Minimum Rating and Blank Reviews filters. You can select the star rating and show your best reviews to the new visitors.
Once you are satisfied with all these settings, click on the ‘Save’ button and then click on the ‘Copy Shortcode’ button.
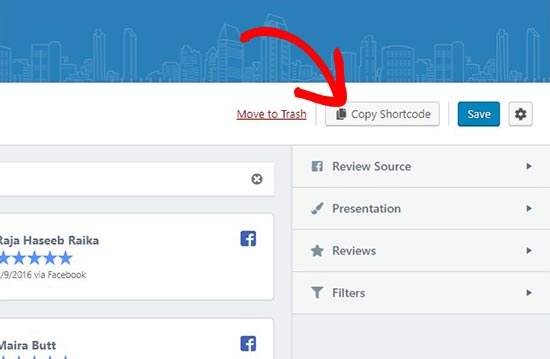
You can add this shortcode anywhere on your WordPress site to display the business reviews collection.
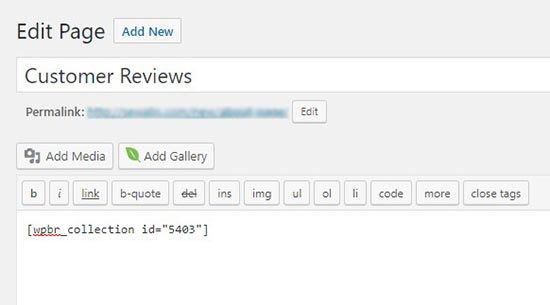
This shortcode will show the complete collection of reviews that you created above.
If you want to show a single review on your WordPress post, page, or sidebar widget, then go to Reviews » Single Review page and copy the shortcode of the preferred single review.
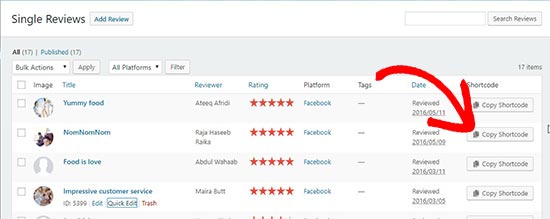
You can paste this shortcode anywhere on your posts, pages, or template files to display the single review instead of the complete reviews collection. It also allows you to manually add custom reviews in WordPress.
If you want to show the reviews in a widget area of your website, then you can do this by heading over to the Appearance » Widgets in your WordPress admin and draging the WP Business Reviews Collection widget to the preferred widget area.
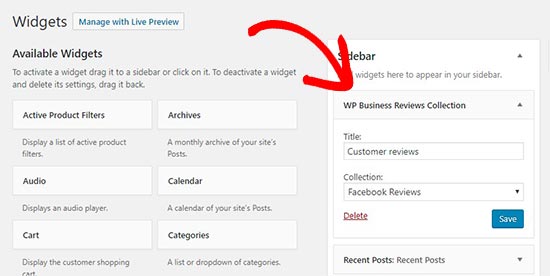
Next, simply select the reviews collection in the widget dropdown to show business reviews in your sidebar.
Once you are done, you can head over to your website to see the business reviews in action.

You can create multiple collections of Google, Facebook, and Yelp reviews for different pages in WordPress. It lets you customize the style and presentation of all your reviews, so they appear beautifully on your website.
That’s all. We hope this article helped you learn how to show Google, Facebook, and Yelp reviews in WordPress. You may also want to see our guide on how to add a customer reviews page in WordPress.
If you liked this article, then please subscribe to our YouTube Channel for WordPress video tutorials. You can also find us on Twitter and Facebook.
The post How to Show Google, Facebook, and Yelp Reviews in WordPress appeared first on WPBeginner.
from WPBeginner https://ift.tt/2SsUXbK
via IFTTT
No comments:
Post a Comment