Anyone can have a great idea. But turning an idea into a viable business is a different ballgame.
You may think you’re ready to launch a startup company. That’s great news, and you should be excited about it.
Take it from me: as someone who has founded several startup companies, I know what it takes to be successful in this space.
Before you start seeking legal advice, renting office space, or forming an LLC, you need to put your thoughts on paper. This will help you stay organized and focused.
You’ll also be able to share this plan with others to help you get valuable feedback. I don’t recommend starting a company without consulting people first.
A typical business plan consists of the following elements:
- executive summary
- company description
- market research
- description of products and/or services
- management and operational structure
- marketing and sales strategy
- financials
Thoroughly writing out your plan accomplishes several things.
First, it gives you a much better understanding of your business. You may think you know what you’re talking about, but putting it on paper will truly make you an expert.
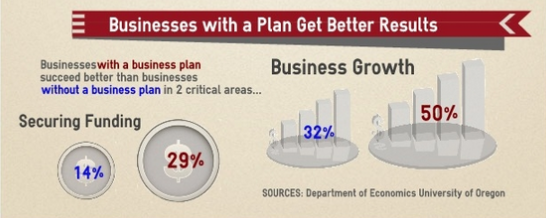
Writing a formal plan increases your chances of success by 16%.
Having a business plan also gives you a better chance of raising capital for your startup company. No banks or investors will give you a dollar if you don’t have a solid business plan.
Plus, companies with business plans also see higher growth rates than those without a plan.
If you have an idea for a startup company but not sure how to get started with a business plan, I’ll help you out.
I’ll show you how to write different elements of your business plan and provide some helpful tips along the way. Here’s what you need to know to get started.
Make sure your company has a clear objective
When writing a company description, make sure it’s not ambiguous.
“We’re going to sell stuff”
isn’t going to cut it.
Instead, identify who you are and when you plan on going into business. State what kinds of products or services you’ll be offering and in what industry.
Where will this business operate? Be clear whether you’ll have a physical store, operate online, or both. Is your company local, regional, national, or international?
Your company description can also incorporate your mission statement.
This is an opportunity for you to gain a better understanding of your startup. The company summary forces you to set clear objectives. The type of company you have and how you will operate should be obvious to anyone who reads it.
Include the reasons for going into business. For example, let’s say you’re opening a restaurant. A reason for opening could be that you identified that no other restaurants in the area serve the cuisine you specialize in.
You can briefly discuss the vision and future of your startup company, but you don’t need to go into too much detail. You’ll cover that in greater depth as you write the rest of your business plan.
Keep in mind, this description is a summary, so there’s no reason for you to write a ton. This section should be pretty concise and no more than three or four paragraphs.
Identify your target market
Your business isn’t for everyone. Although you may think everyone will love your idea, that’s not a viable business strategy.
One of the first steps to launching a successful business is clearly identifying the target market of your startup.
But to find out whom you’ll target, you need to conduct market research.
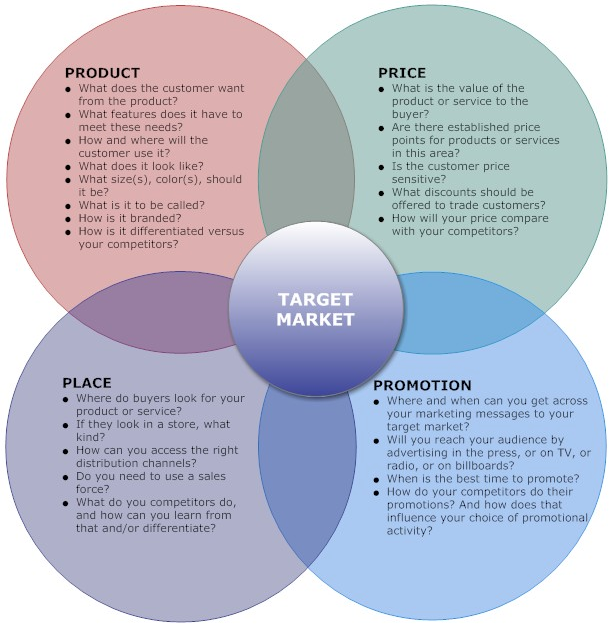
This is arguably the most important part of launching a startup company. If there’s no market for your business, the company will fail. It’s as simple as that.
All too often I see entrepreneurs rush into a decision because they fall in love with an idea. Due to this tunnel vision, they don’t take the necessary steps to conduct the proper research.
Sadly, those businesses don’t last.
But if you take the time to write a business plan, you may discover there’s not a viable market for your startup before it’s too late. It’s much better to learn this information in these preliminary stages than after you’ve dumped a ton of money into your venture.
To figure out your target market, start with broad assumptions and slowly narrow it down. Typically, the best way to segment your audience is using these four categories:
- geographic
- demographic
- psychographic
- behavioral
Start with things like:
- age
- gender
- income level
- ethnicity
- location
As I said earlier, start broadly. For example, you may start by saying your target market lives in North America, and then narrow it down to the United States.
But as you continue going through your market research, you can get even more specific. You can target customers living in New England, for example.
By the time you’re finished, the target market could look something like this:
- males
- ages 26 to 40
- living in the Boston area
- with an annual income of $55,000-$70,000
- who are into recycling
This profile encompasses all four demographic segments I mentioned earlier. Plus, it’s very specific.
Your business plan should talk about the research you conducted to identify this market. Talk about the data you collected from surveys and interviews.
You’ll use this target market in other sections of the business plan as well when you discuss future projections and your marketing strategy. We’ll cover both of those topics shortly.
Analyze your competition
In addition to researching your target market, you need to conduct a competitive analysis as well. You’ll use this information to create your brand differentiation strategy.
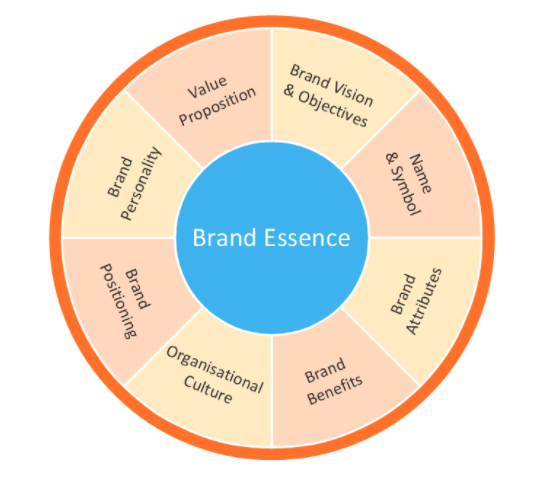
When you’re writing a business plan, your startup doesn’t exist yet. Nobody knows about you. Don’t expect to be successful if you’re planning to launch a competitor’s carbon copy.
Customers won’t have a reason to switch to your brand if it’s the same as the company they already know and trust.
How will you separate yourself from the crowd?
Your differentiation strategy could involve your price and quality. If your prices are significantly lower, that can be your niche in the industry. If you have superior quality, there is a market for that as well.
Competitive analysis should be conducted simultaneously with identifying your target audience. Both of these fall under the market research category of your business plan.
Once you figure out who your competitors are, it will be easier to determine how your company will be different from them. But this information will be based on your target market.
For example, let’s say you’re in the clothing industry. Your competitors will depend on your target market. If you’re planning to sell jeans for $50, you won’t be competing with designer brands selling jeans for $750.
Or you can base your price differentiation on what you learned about your target market. From there, you’ll be able to identify your competitors.
As you can see, the two go hand in hand.
Budget accordingly
You need to have all your numbers in order when you’re writing a business plan, especially if you’re planning on securing investment funding.
Figure out exactly how much money you need to start the business and stay operational; otherwise, you’ll run out of money.
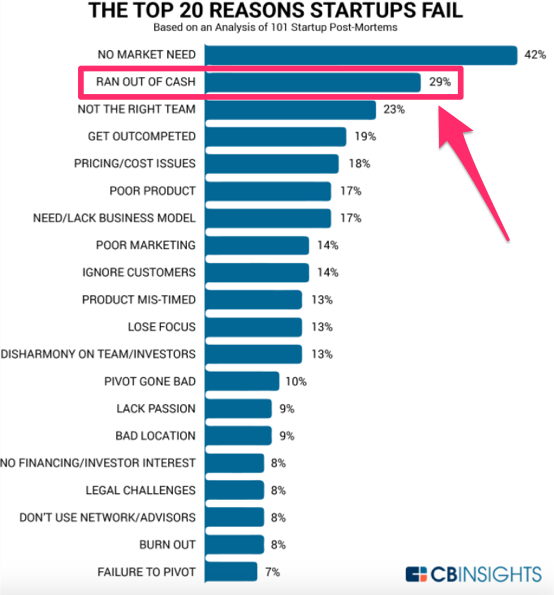
Running out of cash is one of the most common reasons why startup companies fail. Taking the time to sort your budget out before you launch will minimize that risk.
Consider everything. Start with the basics like:
- equipment costs
- property (buying or leasing)
- legal fees
- payroll
- insurance
- inventory
Here’s an example of what this will look like in your business plan:
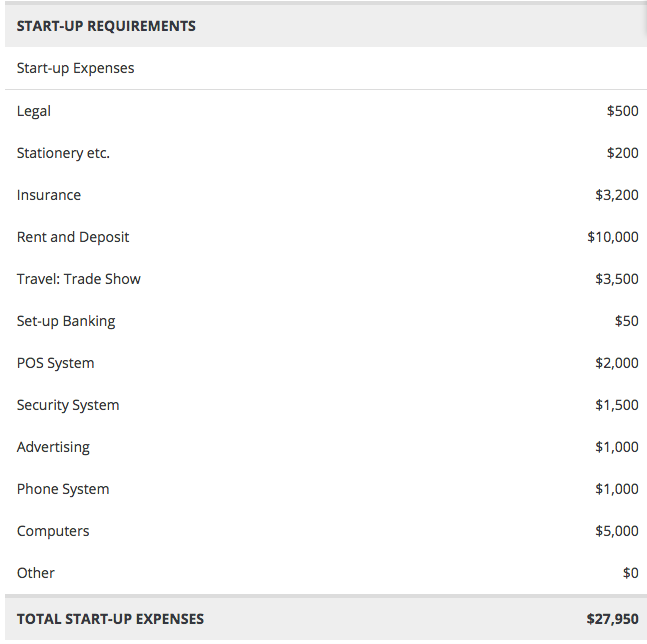
These numbers need to be accurate. When in doubt, estimate higher. Things don’t always go according to plan.
In the example above, although the total startup expenses are less than $28k, it may not be a bad idea to raise $40k or even $50k. That way, you’d have some extra cash in the bank in case something comes up.
You don’t want poor budgeting to be the reason for your startup’s failure.
Identify your goals and financial projections
Let’s continue talking about your financials. Obviously, you won’t have any income statements, balance sheets, cash flow reports, or other accounting documents if you’re not fully operational.
However, you can still make projections. You can base these projections on the total population of the target market in your area and what percentage of that market you think you can penetrate.
If you have an expansion strategy in mind, this would also be outlined in your financial projections.
These projections should cover the first three to five years of your startup. Make sure they are reasonable. Don’t just say you’ll make $10 million in your first year. In fact, your company may not be even profitable for the first couple of years.
That’s OK.
As long as you’re being honest with yourself and potential investors, your financial plan will cover your break-even analysis.

While it’s reasonable to expect your sales revenue to increase each year, you still need to take all factors into consideration.
For example, if you’re planning to expand to a new location in year four, your financial projections need to be adjusted accordingly.
You may not be profitable until your third year of operation, but if you’re opening a new facility in year four, that year may have a net loss as well. Again, this is completely fine as long as you’re planning and budgeting accordingly.
Another example of a goal could be launching an ecommerce store in addition to your brick-and-mortar locations. Just don’t try to bite off more than you can chew. Keep everything within reason.
Clearly define the power structure
Your business plan should also cover the organizational structure of your startup. If it’s a small company with just you and maybe one or two business partners, this should be easy.
But depending on how you’re planning to scale the company, it’s best to get this sorted out sooner rather than later. Here’s an example of what your organizational chart may look like:
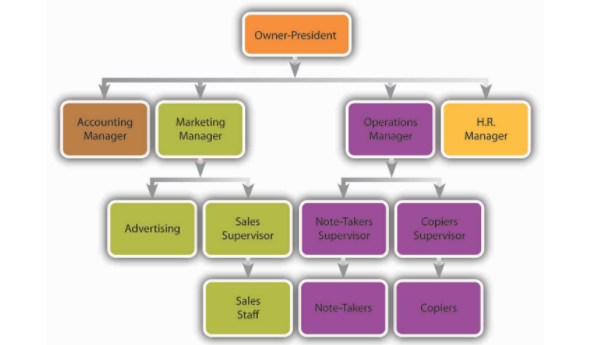
It’s really important to have this hierarchy in place before you get started. That way, there’s no debate over who reports to which position. It’s clear who is in charge of specific people and departments.
Don’t get too complex with this.
If you put too many layers of managers, directors, and supervisors between the top of the chart and the bottom of the chart, things can get confusing.
You don’t want any instructions or assignments to get lost in translation between levels. You also don’t want anyone to be confused about who is in charge.
This is an opportunity for you to outline how your company will operate in terms of board members and investors. Who has the final say in decisions?
While I understand you may need to give up some equity in your startup to get off the ground, I recommend keeping the power in your hands.
Discuss your marketing plan
Your marketing plan relies on everything else I’ve talked about so far.
How will you acquire customers based on the market research of your target audience and competitive analysis?
This strategy needs to be aligned with your budget and financial projections as well.
I could sit here and talk about different marketing strategies all day. But there’s no right or wrong way to approach this for your startup company.
My recommendation would be to stay as cost-effective as possible. Be versatile and well-balanced too.
Acquiring customers is expensive. You don’t want to dump your entire marketing budget into one strategy. If it doesn’t work, you’ve got nothing to fall back on.
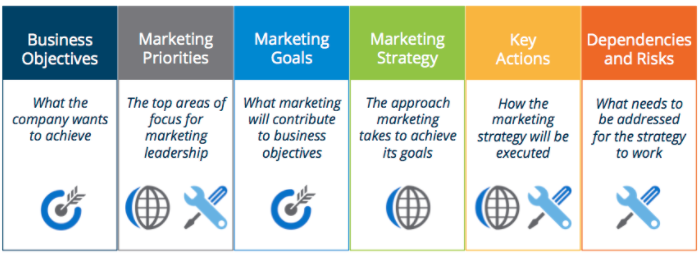
Take these categories into consideration when you’re coming up with a marketing plan:
Before you try anything too crazy, get the basics sorted out first:
- launch a website
- stay active on social media platforms
- start building an email subscriber list
- focus on customer retention
- come up with customer loyalty programs.
Don’t ease into this one step at a time. Come out fast. Even before your company officially launches, you can start building your website and social media profiles.
The last thing you want is for consumers to find out about your brand but then be unable to find your website or contact information. Or worse, get directed to a website that’s broken or unfinished.
Keep it short and professional
I’ve talked about many different components of your business plan. It may sound overwhelming, but don’t be alarmed.
This shouldn’t be a 100-page dissertation.
You definitely want it to be detailed and thorough, but don’t go overboard. There’s no exact number of pages it should be, but have at least one page per section.
It should also be written cleanly and professionally. Don’t use slang terminology.
Proofread it for grammatical and spelling errors.
Remember, you may need to use this to raise capital. People may be hesitant to give you money if you overlook the small stuff like proper grammar.
Conclusion
Launching a startup company is exciting. It’s easy to get so caught up in the moment that you rush into things.
If you want to set yourself up for success, you need to take a step back and plan things out.
Going through the process of writing a formal business plan will increase your chances of securing an investment and also improve your potential growth rate.
The market research you’ll need to conduct in order to write this plan will also help you determine whether this is a viable business venture to proceed with.
If you’ve never written a business plan, use this post as a guide for what you should include. Follow my tips for best practices.
Writing a business plan may seem like a tedious task right now, but I promise it will keep you organized and save you lots of headaches down the road.
Good luck!
What elements of a business plan have you started drafting for your startup company?

from Quick Sprout http://ift.tt/2ETmznv
via
IFTTT






 500px, the photo-sharing site that once proposed to take on Flickr and Getty, has been acquired by Visual China Group (VCG), a strategic investor in 500px via previous financings. A publicly-traded image licensing company – and China’s Getty, so to speak – bought Corbis in 2016, and is now the world’s third-largest visual content provider. It sees 500px, which now has…
  Actions on Google, the Google Assistant’s version of what Amazon calls ‘skills,’ have been around for a while, but Google today announced it is expanding the platform to support a wider group of international developers, in addition to a number of other features for the platform. Maybe the most important update here is that Actions are now available in seven new languages:…