Amazon UK

Tuesday, 31 July 2018

How to Add One-Click Login With Google in WordPress

Do you want to add one-click login with Google to your WordPress site? Allowing users to login with their Gmail account saves them time because they wouldn’t have to remember their WordPress username and password. In this article, we will share how to easily add one-click Google login in WordPress.

How to add one-click login with Google in WordPress

Why You Should Add One-Click Google Login in WordPress?

Most internet users remain logged in to their Google accounts. This allows them to quickly access all Google apps like Gmail, Drive, Docs, Photos, and more without signing in separately for each app.

Having one-click Google login activated on your WordPress login page allows your users to quickly sign-in to your website using their Gmail account. It saves them time, and they wouldn’t have to enter their login credentials each time.

If your organization uses GSuite for professional business email addresses, then your team members can use your organization’s Google apps accounts for login.

If you run a simple WordPress blog, then you might not find this feature useful. However single sign-on feature like one-click Google login is very helpful for any websites that require users to login such as multi-author websites, membership websites, and websites selling online courses.

That being said, let’s take a look on how to easily add one-click login with Google to your WordPress website.

Adding One-Click Gmail Login in WordPress

First thing you need to do is install and activate the Google Apps Login plugin. For more details, see our step by step guide on how to install a WordPress plugin.

Upon activation, you need to go to Settings » Google Apps Login page in your WordPress admin area. Under the Main Setup tab, you’ll need to add Client ID and Client Secret code.
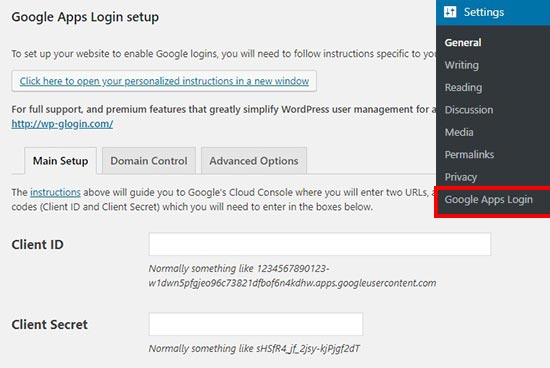
Apps login settings page

To get these details, you need to visit Google Developers Console. If you are not already logged in, then you will be asked to login with your Google account.

Next, you need to click on Start a project from the top menu. It will open a popup where you would click on New Project button to continue.
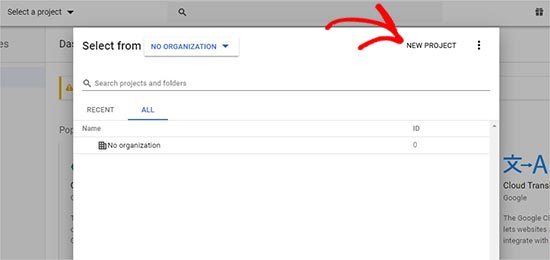
New project

Now, you need to add a project name and select the location. Project name can be anything, and Location will be your organization’s domain name (example.com). If you are logged in with your company’s Google account or your GSuite account, then it will add the location and organization automatically.
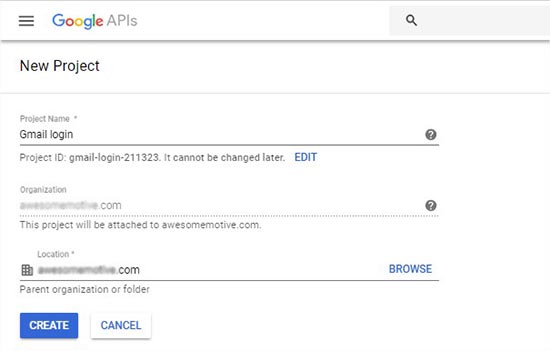
Project, location, and organization name

However, if you are creating a project from your personal Google account, then you can leave the location with No Organization selected.
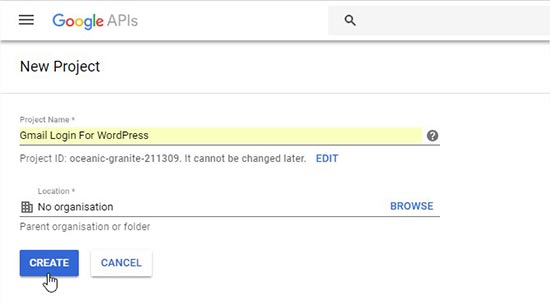
Project name and location

Next, click on the Create button to continue.

You’ll now be redirected to APIs & Services dashboard. On this page, you need to click on Credentials from the left menu and go to OAuth consent screen page.

In the Email Address field, you need to add your email address that you have used to create this project. Also you need to add your website URL in the Homepage URL field and click on the Save button.
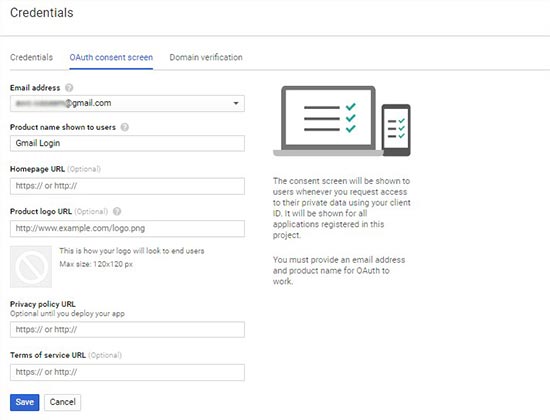
OAuth consent screen

After that, it will take you to the Credentials page again. Go ahead and click on the Create Credentials button to select OAuth client ID option.
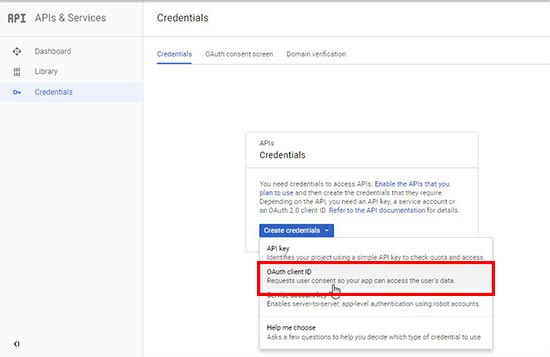
OAuth client ID

Next, you need to select Web application as an Application type. In the Authorised JavaScript origins field, you need to enter your website URL (http://www.example.com), and add WordPress login page URL (https://ift.tt/12fdRXe) in the Authorised redirect URLs field.
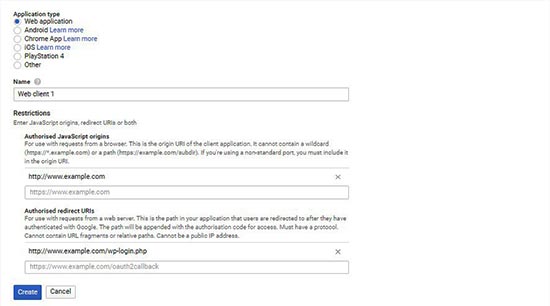
Web application type

After that click on the Create button, and you’ll see your Client ID and Client Secret information in a popup.
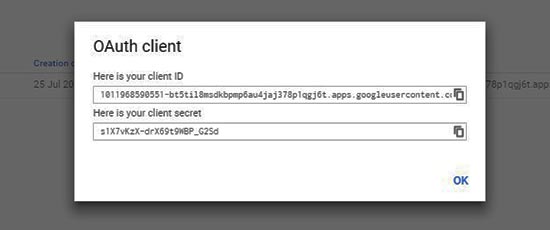
Client ID and Client secret

You need to copy and paste these keys on the plugin’s settings page in your WordPress admin area.
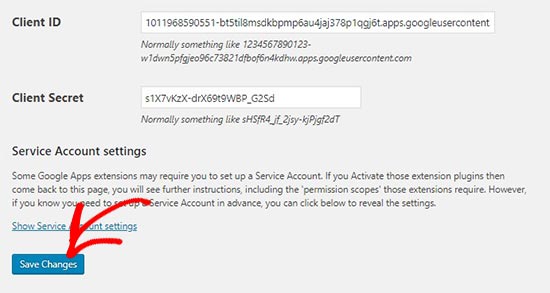
Add client ID and client secret in WordPress

After that, you can simply logout from your WordPress admin account, and you’ll see a Login with Google button on your login screen.
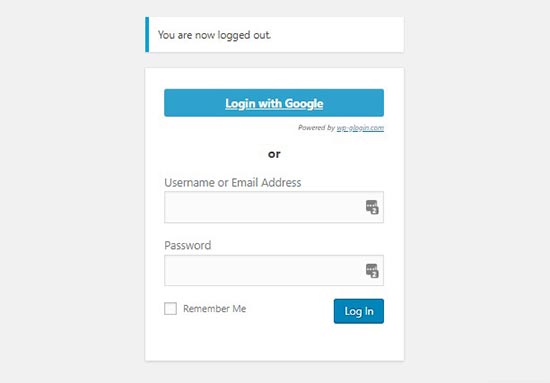
Login with Google

Clicking on the button allows you to login with one-click into your WordPress account. However, keep in mind that users can only login with the Google account address that they have used on your website.

We hope this article helped you learn how to add one-click login with Google in WordPress. You may also want to see our guide on how to create a login popup modal in WordPress, and how to create a custom user registration form in WordPress.

If you liked this article, then please subscribe to our YouTube Channel for WordPress video tutorials. You can also find us on Twitter and Facebook.

The post How to Add One-Click Login With Google in WordPress appeared first on WPBeginner.


from WPBeginner https://ift.tt/2OnRvNL
via IFTTT

Six Non-Photography Tips to Super-Charge Your Travel Photography

It’s a real challenge to portray the true essence of a destination and to show it to the world the way you see it. This genre, travel photography, calls for immense creativity, technical expertise, and unflinching dedication to the art. Every little detail that can weigh off your shoulders count.

I have been traveling across the most remote corners of the country and beyond for years now, and the best results are a boon of some of the non-photography decisions I’ve made. When you are on the road for long, you realize the real beauty of a travel shot goes deeper than its aesthetic value. All the technical training in the world, the best gear money can buy, and time-tested templates of composition can only take you so far. But then comes the real work. The stuff that makes a photograph, speak.

Six Non-Photography Tips to Super-Charge Your Travel Photography - overhead shot of a road and field

Here are six non-photography tips that will help you improve and super-charge your travel photography.

#1 – Go solo

This insanely frightening, uncomfortable, non-economic travel decision is also the most rewarding of all. This might mean, you will have to make all the plans, work out all the logistics, and deal with any issues by yourself. But, in a very unexpected way, this is what you need.

Travel photography does not allow for the luxury of blending and adjusting to plans of your co-travelers. The darkest hours, the first light of the sun, the busiest markets – what catches the artist’s eyes are endless. To be at the right time and the right place, you will need the freedom you only get when you have no strings attached.

Six Non-Photography Tips to Super-Charge Your Travel Photography - camera and the ocean

You must be ready to ditch your plans and make new ones at a snap, and be prepared for longer stays to get that one single extraordinary shot. Besides, you can always find backpacker hostels, local transport, and the denizen cuisine to fit into the budget; even without a companion to share the charges.

#2 – Learn the tongue

This tip is not just for the special ones with an eidetic memory though. Practically, all you need are a few dozen commonly used phrases and words to get the ball rolling. You will be amazed at how useful a little conversation with the locals can turn out to be, albeit with broken wording and all.

Six Non-Photography Tips to Super-Charge Your Travel Photography - Chinese writing

Learning the tongue goes beyond speaking a few words. It’s also about how you approach the culture and the people within. You have to understand them, think like them and start feeling their home like they do. That doesn’t just open up new doors and undiscovered locations but puts truth in the photographs.

The more you blend in with their culture, the more un-alienated the subject can be perceived.

#3 – Take the local choice

lady buying a bracelet from a monk - Six Non-Photography Tips to Super-Charge Your Travel Photography

The tourist trails are often unrevealing and pompous. The rustic secrets, the basic ingredients to amazing travel photographs need to be chased by getting off track. This might mean, taking the bumpy bus rides, eating spicy street food, cramped roadside shows, and everything over and under.

It adds an amazing perspective, nothing else can provide. Look for couch surfing and home-stays. Try the local cuisine and home-made meals. Take the local roads and transport, and even take part in the native leisure and social events. All of these things will add rocket fuel to your images.

Six Non-Photography Tips to Super-Charge Your Travel Photography - man sitting under columns

#4 – Volunteer

Taking time off from your camera sounds crazy, right? Being a part of the local’s life, besides gives an understanding of the destination, can be translated into unique perspectives, flavors, and themes in your work. The financial freedom, longer stays and new acquaintances are also invaluable.

bowl and hand with a stick - Six Non-Photography Tips to Super-Charge Your Travel Photography

This can be extended to work exchanges, internships, or any other short-term work you can find. Sites like Workaway, Volunteerhq, Helpx offer tons of opportunities all over the world. Deviating a little, one can consider online work, that can enable extended stays in a single place.

The goal is to try and get an inclusive feeling into the community and culture, standing in their shoes before photographing their homes.

#5 – Stay fit. Stay resistant.

mountains - Six Non-Photography Tips to Super-Charge Your Travel Photography

Being picky when traveling is the one biggest art killers. Compatibility of body and mind in extreme of conditions is the greatest tool you can ever have. A travel photographer needs to endure heat, rain, snow, and hail alike and still be ready to go.

Training so you are able to walk for miles or travel for hours is worth the effort exponentially. Being able to sleep wherever, eat whatever, and tune your body to be able to function in diverse habitats, let’s you break the physical barriers needed to visit THE photo spot. A tired body can no longer push itself for perfection.

Six Non-Photography Tips to Super-Charge Your Travel Photography - underwater shot

#6 – Be ready to take the leap

Adventure and nature photography are close cousins of the travel genre, and mastering them too makes you a Jedi. Most of your favorite shots are from off-beat places only the deadliest daredevils venture out. Economic travel facilities and easy gear have saturated the internet with spectacular shots.

sunset silhouette - Six Non-Photography Tips to Super-Charge Your Travel Photography

To make the difference, you have to see like no one has ever seen and go where no one has ever been. This might mean kayaking down the stream, cycling up a valley, hiking up a hill, or flying on a glider. Sometimes this might even mean, getting your own ride, staying in tents, and living off candy bars.

And more essentially, have a heart filled with enthusiasm and craving for adventure. Every step forward past other photographers is a step forward to more unique travel shots.

man in a field - Six Non-Photography Tips to Super-Charge Your Travel Photography

Conclusion

None of these skills require special training or innate power to accomplish. All of them can and will be acquired over time. But to be ready with these in mind, you can get one step ahead of every other photographer in town.

More than anything, a good travel photograph tells a good story and has a strong spirit to it. The best camera is what you have with you, or so they say. So, it’s time to hack into how you are going to make the best of it!

The post Six Non-Photography Tips to Super-Charge Your Travel Photography appeared first on Digital Photography School.


from Digital Photography School https://ift.tt/2M0cggN
via IFTTT

Creative Macro Photography – Using Fairy Lights

Are you interested in doing some creative macro photography? Oftentimes, we macro photographers find ourselves photographing the same subjects over and over, searching for new compositions that seem like they’ll never appear.

fairy light creative macro photography flower

In this article, I’ll discuss a macro photography technique that will get you out of that creative rut: using fairy lights. I’ll explain where to purchase them, how to set them up, and how to use them. Ultimately, you’ll learn how to enhance your macro photography with a cheap accessory. You’ll even have lots of fun in the process!

What are fairy lights?

Fairy lights are tiny LED lights. They come in a number of different colors and can be picked up for cheap ($10 or thereabouts) on Amazon.com. I prefer to use warm white colored fairy lights, but feel free to experiment. Different colors will give your photographs different tones.

fairy light creative macro photography flower daisy

What makes fairy lights interesting?

There is one reason why I love fairy lights, and it is this:

Bokeh, bokeh, bokeh!

When placed properly in a photograph, fairy lights can create wonderful out of focus highlights that add a magical feel to your images.

fairy light creative macro photography flower

This can be used in any genre of photography. For instance, it is fairly popular in some portrait photography circles. But I most enjoy using fairy lights in creative macro photography, which is what I’ll be focusing on in this article.

How to use fairy lights?

Work in the twilight hour

Fairy lights are not very bright relative to ambient light. Therefore, it’s necessary to shoot late in the day.

fairy light creative macro photography flower daisy

I photographed this daisy a few minutes after sunset.

If your subject is shaded, or if the day is cloudy, you can start shooting a few minutes before the sun has gone down. As the level of ambient light decreases, the overall look offered by the fairy lights will change.

The fairy lights will become more noticeable, and will really pop off the background (which can be good or bad, depending on the look you desire).

fairy light creative macro photography flower bokeh

I generally shoot until I can no longer handhold my camera. This is usually in the area of 30 minutes after sunset. However, If you like to use a tripod, feel free to stay out later.

Shoot wide open and feel free to underexpose

What should you use for camera and lens settings?

The lens aperture is the easiest setting to choose, widen it as much as possible. Not only does this let in the most light (to compensate for the lack of ambient lighting), but it also blurs the fairy lights in a more pleasing way.

Therefore, when working with fairy lights, I generally stick to my lens’s widest aperture, usually f/2.8.

fairy light creative macro photography flower bokeh

This image was taken with a shallow aperture to ensure better bokeh. The large blobs (lower right) were created by putting some of the lights closer to the camera than the flower.

As for shutter speed, I meter off the main subject (for me, this is usually a flower), and then deliberately underexpose the image. Why? I like that blue twilight aesthetic and I want it to be clear that the image was taken after sundown. This also really causes the fairy lights to stand out.

Regarding lenses, I usually shoot with a macro lens. However, you might also work with another fast lens, such as a 50mm f/1.8. These have the added benefit of being smaller and are therefore easier to handhold.

fairy light macro photography flower bokeh

In macro photography, being able to focus manually is often essential. This is even truer when it comes to fairy light photography. When working in such dark conditions, your autofocus will hunt and hunt until the light is completely gone and you’re forced to pack up.

Instead, switch your lens to manual focus. You can also switch on Live View, which can be very helpful in such difficult conditions.

Place the fairy lights directly behind or in front of the subject

There are two general approaches that I recommend for fairy light photography.

#1 – Put the lights a few inches behind the subject

This distance can decrease if you’re working at high magnifications or a very wide aperture. But it should increase if you are farther from your subject or working with a narrow aperture. If I’m photographing flowers, I often just drape the lights over other flowers or branches behind the main subject.

fairy light creative macro photography flower bokeh aster

I positioned some fairy lights behind this flower by placing them in a nearby bush.

The key is to ensure that the lights themselves are out of focus. You don’t want viewers to look at your images and actually see the fairy lights as fairy lights. They should appear as beautiful background highlights. This means that you should work with a bit of distance between the subject and the fairy lights in the background.

Holding the lights in behind the daisy.

Final image.

#2 – Put the lights in front of the subject

The second approach is harder to pull off but is well worth the difficulty. This involves placing the fairy lights in front of the subject, close enough to the lens that they remain out of focus.

fairy light creative macro photography flower daisy

I held the fairy lights between the lens and the subject in order to ensure the fairy lights remained out of focus and generated strong bokeh for this image.

I generally hold the lights in front of the lens with my left hand while manual focusing the lens with the other. This ensures that the fairy lights remain nothing more than out of focus highlights.

fairy light creative macro photography flower bokeh

Final Techniques to Consider

Now you know the basics of fairy light macro photography. But how do you create compelling images?

creative macro photography fairy lights

I find that there’s a particularly useful guideline for fairy light photography which is to incorporate the fairy lights into the composition.

creative macro photography fairy lights flower daisy bokeh

That is, don’t just let the fairy lights spray randomly throughout the background. Yes, this will result in an interesting image, but it will probably seem chaotic as well. In any type of photography, you want every bit of your photograph to be deliberate. Fairy light macro photography is no exception.

Instead, compose so that the fairy lights complement the main subject. Place them so that they appear above the subject (in the background). Make them appear beside the subject. Put them so that they seem to ring the main subject.

creative macro photography fairy lights flower cosmos bokeh

I held the fairy lights in the bottom of the frame, so as not to obscure the flower.

If you are using the second technique that I mentioned above, in which you put the fairy lights in front of the lens, make sure that they don’t block out important parts of the subject.

You don’t want to obscure your main subject with lights. It needs to be recognizable in order to offer a point for the viewer to focus on.

creative macro photography fairy lights flower aster

Conclusion

Fairy lights can add creative flair to your macro photography. They can also help you get out of a creative rut.

If all goes well, you might find yourself inspired to experiment with different colored fairy lights, or even take them with you when engaging in other genres of photography like portrait or pet photography.

creative macro photography fairy lights flower bokeh

By following the guidelines set out above, you’ll be able to take some fantastic eye-catching images!

Got any creative macro photography techniques of your own? Please share them in the comments section below.

fairy light macro photography flower

fairy light macro photography flower abstract

fairy light macro photography flower daisy abstract

fairy light macro photography mushroom

fairy lights photography leaves autumn

The post Creative Macro Photography – Using Fairy Lights appeared first on Digital Photography School.


from Digital Photography School https://ift.tt/2mUn2KK
via IFTTT

Here comes the sunscreen

Apply Sunscreen

Apply Sunscreen

The three toughest things about being a parent are the sleep deprivation, knowing when to let kids push their boundaries vs keeping them safe, and applying sunscreen to a toddler. The NY Times has a slideshow of parents applying sunscreen to their kids and the struggle is real!

The good news for you parents of young children is that eventually they learn how to apply their own sunscreen. The bad news? They still would rather have a finger lopped off than to do it without complaining Every. Single. Freaking. Time.

Tags: parenting   photography

from kottke.org https://ift.tt/2AlkoXM
via IFTTT

Cross-section time lapse of a kidney bean growing into a plant

It’s fun to watch this kidney bean grow into a plant over the course of 25 days to the strains of The Blue Danube waltz by Johann Strauss. Thanks to this cross-sectional view, you can see the main root push down into the soil and the tendrils branching out to anchor the plant for its remarkable vertical growth to come.

Tags: time lapse   video

from kottke.org https://ift.tt/2Alg0Ip
via IFTTT

Moon 101, a quick explainer video from National Geographic about the Moon

I have been going a little Moon crazy lately. There was the whole Apollo 11 thing, I finished listening to the excellent audiobook of Andrew Chaikin’s A Man on the Moon (which made me feel sad for a lot of different reasons), and am thinking about a rewatch of From the Earth to the Moon, the 1998 HBO series based on Chaikin’s book. This video from National Geographic answers a lot of questions about the Moon in a short amount of time.

Tags: astronomy   Moon   science   video

from kottke.org https://ift.tt/2mT6VwM
via IFTTT

Virtually reality

From Vladimir Tomin, a fun augmented reality video where he uses a set of image editing tools to manipulate the scenery in fanciful ways. (It’s kinda hard to describe this…just give it 5 seconds and you’ll get the idea.)

(via Instagram’s explore page (yes, I’m the guy who uses the IG explore page))

Tags: art   video   Vladimir Tomin

from kottke.org https://ift.tt/2M2TPIk
via IFTTT

CPA Cash Machine